Contributing Articles
Thank you for deciding to contribute articles to this wiki! The only way this wiki has come this far, and for it to continue to grow is through contributions.
This guide will help you write, format, and implement your article into the wiki.
Forking the GitHub Repository
In order to send a Pull Request (PR) to the wiki to request your article to be added, you have to fork the ModdingWiki repository (repo).
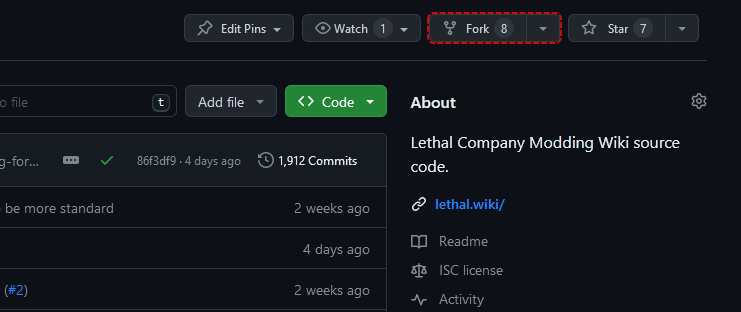
To fork the wiki, it's fairly simple. You'll click the Fork button on the webpage, then click Create fork.
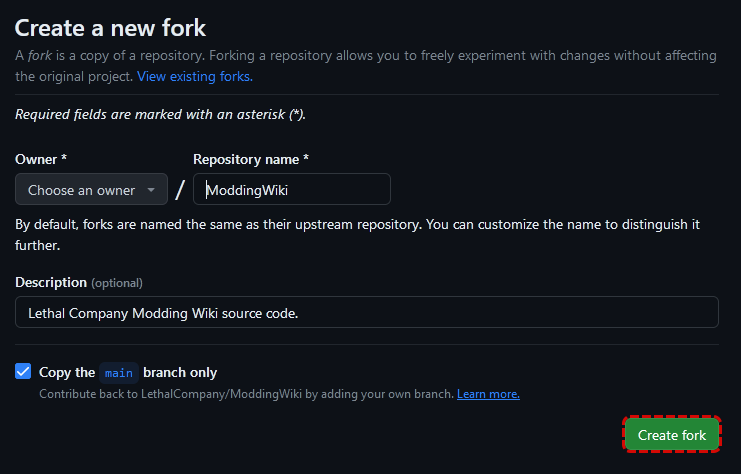
Now we've created the fork! From there you can make changes to a branch on the fork and create the PR when you're finished.
Creating the File
Creating the article file is pretty simple. Add the file to the folder/subsection you are adding to, such as /docs/dev/api/ for APIs, and create a markdown file (.md).
IMPORTANT
Make sure you make your file name with no spaces or symbols, other than - to replace spaces!
For example, this article is named writing-articles.md and is located in /docs/extras/.
Viewing Your Article
This website uses VitePress to turn the markdown files into viewable webpages. To view your article in context as a webpage, it's simple.
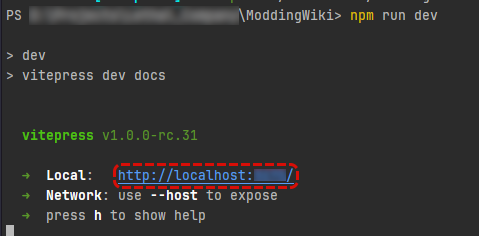
To run VitePress and view as a local site, run the following command in the terminal:
npm run devTIP
This must run in your repo folder. You can do so using the terminal in the code editor/IDE that you use.
The terminal will then display the following, at which point you can go to the URL given in the terminal:
Frontmatter
VitePress uses YAML Frontmatter for article configs. There are three commonly used settings, description, prev, and next.
Description
In order to have descriptive info for search engines and embeds, you have to add a description to the front matter. To do so, you need the following code at the start of your article:
---
description: Example description
---
TIP
The description should be a short and descriptive; it should only be one to two sentences long.
For example, the description for this article is the following:
---
description: How to contribute new articles to the wiki.
---
Previous & Next
You may have seen previous or next article buttons at the bottom of wiki pages. They can be enabled or disabled in the frontmatter section, using prev and next.
By default, the previous and next buttons are disabled. To enable these buttons, you need to set the options to true:
---
prev: true // [!code ++]
next: true // [!code ++]
description: Example description
---
IMPORTANT
The frontmatter section must be at the beginning of the file, otherwise it will not work. For example, correct.md will display a correct markdown file, and incorrect.md will display an incorrectly written markdown file.
---
prev: false
next: false
description: Example description
---

# Example Article<!-- Extra space causes errors -->
---
prev: false
next: false
description: Example description
---
# Example ArticleFormatting
Markdown
This wiki uses a modified version of markdown (.md) files for articles, allowing a fairly easy process to write a new article. Markdown essentially is a simple text file with "shortcuts" that help with formatting. An example of this is in Discord, where you can easily format your messages to be bold, italicized, etc.
TIP
This Markdown Guide goes into greater detail than the basics given in this article.
Common Usages
There are a few simple ways to format text.
- Using
**on either side of a word/phrase will bold that word/phrase. - Using
_on either side of a word/phrase will italicize that word/phrase. - Using
***on either side of a word/phrase will bold and italicize that word/phrase. - Using
~~on either side of a word/phrase willstrike that word/phrase out.
WARNING
These symbols generally must not have spaces between them and the word(s) you are formatting.
Headings
You may want headings in your article. These are places you can link to which will bring readers to that exact spot on the page. For example, this links to the formatting heading.
There are several different heading "sizes" you can use.
- Using
#will create the main heading (h1). For example, this links to a main heading. - Using
##will create the an h2 heading.
This pattern continues until ######, which creates an h6 heading.
INFO
Unless there is an empty line between lines of text, headings, or other line symbols, the lines of text, heading, code, or whatever else will either not work or be separated as intended.
This text is correctly formatted.

Extra sentence.

---

This text is correctly formatted.
Extra sentence.
This text is incorrectly formatted.
Extra sentence.
---
This text is incorrectly formatted. Extra sentence.Code
You likely will want to display code as examples for readers to view. To do this, there are both code and code blocks.
The main usage of code formatting is to highlight a method or a field. You can do so using a backtick (`) around the code.
You may, however, want to display codeblocks instead. To do so, you can use three backticks (```) around the code. You can also use the language identifier to use color highlighting specific to that language.
For example, the following text, marked as a C# Script:
```cs
public void TestMethod()
{
    // code
}
```
Will be formatted to look like this:
public void TestMethod()
{
// code
}VitePress
This wiki uses VitePress to turn markdown files into a working website. This comes with additional methods to format text into a prettier-looking article.
TIP
This Vitepress Guide goes into greater detail than the basics given in this article
Containers
Containers hold little snippets of text that can be small asides, or important to pay attention to. The general method of creating a container is the following:
::: info
Example container text
:::
This will become formatted by VitePress to look like this:
INFO
Example container text
Common containers are:
infotipwarningdangerdetails
These will vary the coloring of the container. details specifically creates a hidden container that can hold more information.
Example Details Container
Hidden info
Code
You may want to highlight a line/section of code to bring attention to it. You can do this by specifying what lines you want highlighted in braces next to the language identifier.
```cs {2,4-6}
//Example Line 1
//Example Line 2
//Example Line 3
//Example Line 4
//Example Line 5
//Example Line 6
//Example Line 7
```
//Example Line 1
//Example Line 2
//Example Line 3
//Example Line 4
//Example Line 5
//Example Line 6
//Example Line 7You might also want to display the line numbers of code, which can be done by adding :line-numbers after the language identifier.
```cs:line-numbers
//Example Line 1
//Example Line 2
//...
```
//Example Line 1
//Example Line 2
//...Links & Images
Adding links and images to your article is simple using Markdown, although the link itself is more special.
TIP
Directory references start from /docs/, so don't add /docs/ to references when linking to another article or an image.
Links
Using markdown syntax, a link is as simple as wrapping the text in brackets and adding the link in parenthesis. For example, to link to the Wikipedia article on Lethal Company, one could do the following:
Look at [this Wikipedia article](https://en.wikipedia.org/wiki/Lethal_Company) for basic info about the game.To specifically link to another article in this wiki, you should use a relational link instead of a hard link. A relational link is the file directory, whereas a hard link is the actual website URL.
To link to another article, say the Contributing Translations article, you use the following syntax:
[text](/contribute/translating-the-wiki)WARNING
Do not use file extensions in the relational link for webpages/articles, doing so can lead to un-clean URLs (ex. translating-the-wiki.html)
To link to a specific heading, you can add #heading-anchor to the link, where heading-anchor is the specific heading anchor you want to use. To find what anchor to use, click on the heading, and see what anchor is in the URL.
[heading of another article](/installation/syncing-mods#exporting-a-profile)TIP
If you want to do it to another heading in your article, you can drop the link and only have the anchor, like so:
[heading](#example-heading-anchor)Images
To add images to your article, there are two steps:
1. Save the image in the correct directory
Images should be saved in a folder within /docs/public/images, where the folder is labeled the same as your article file name (minus .md).
For example, all images used in this article are saved within /docs/public/images/writing-articles.
2. Add it with the correct syntax
The syntax to add an image is like adding a link.
There are three important parts in this:
- The Exclamation Mark
- This marks the link as an image.
- The Alt Text
- This text will show if the image is not loaded.
- The Image Link
- The directory of the image as well as the file name and extension.
WARNING
When adding the image link, you need to exclude /public from the link as VitePress will automatically look into that directory for images.
Adding Your Article to the Sidebar
In order for people to easily navigate to your article, you must add it to the sidebar. You can do so in docs/.vitepress/config.mts.
First, you must decide which sidebar you want to add your article to. '/' is the Beginner's Guide sidebar and '/modding/' is the Developer's Guide sidebar.
Next, insert the following into your article location:
{
    text: 'Modding APIs',
        items: [
        { text: 'Modding APIs Overview', link: '/apis/modding-apis' },
        { text: 'CustomSounds', link: '/apis/customsounds'},
        { text: 'Overview', link: '/modding/apis/overview' },
        {
            text: 'Asset APIs',
            collapsed: false,
            items: [
                { text: 'CustomSounds', link: '/modding/apis/customsounds'},
            ]
        },
        {
            text: 'Programming APIs',
            collapsed: false,
            items: [
                { text: 'Example Article', link: '<directory>' }, // //
            ]
        }
    ]
},
Where Example Article is the article name, and <directory> is the location and name of the article file. For example, /modding/apis/example-article would be a correct directory/link.
TIP
Please ensure your article name is in Title Case when adding it to the sidebar.
Submitting to GitHub
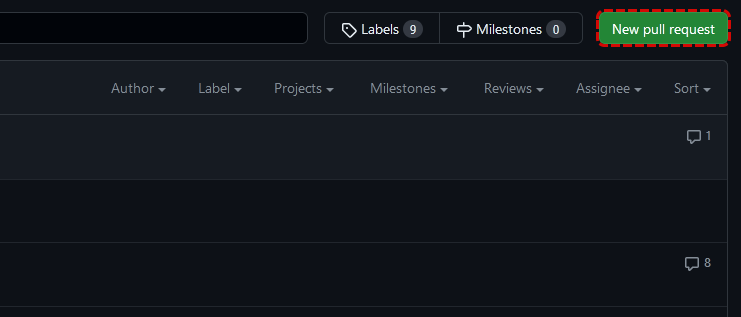
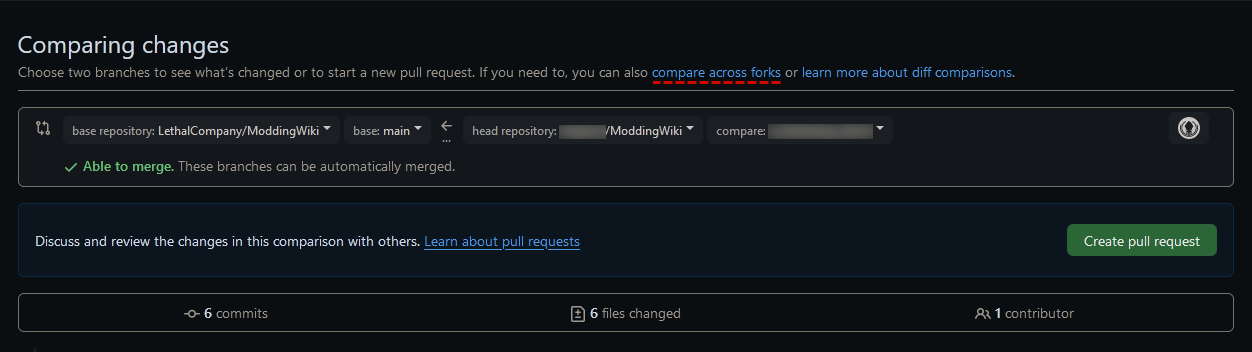
Now that you've written your article, you can submit it easily! First, switch to the Fork tab in GitHub.

There, you can create the pull request (PR) via the button in the top right:
Finally, you can select the branch you used on the right for head/compare, and the main branch in LethalCompany/ModdingWiki for base. If you can't see your fork as an option, click on compare across forks.
After selecting your branch to pull from, click Create pull request. A dialog with a title and description should show up:
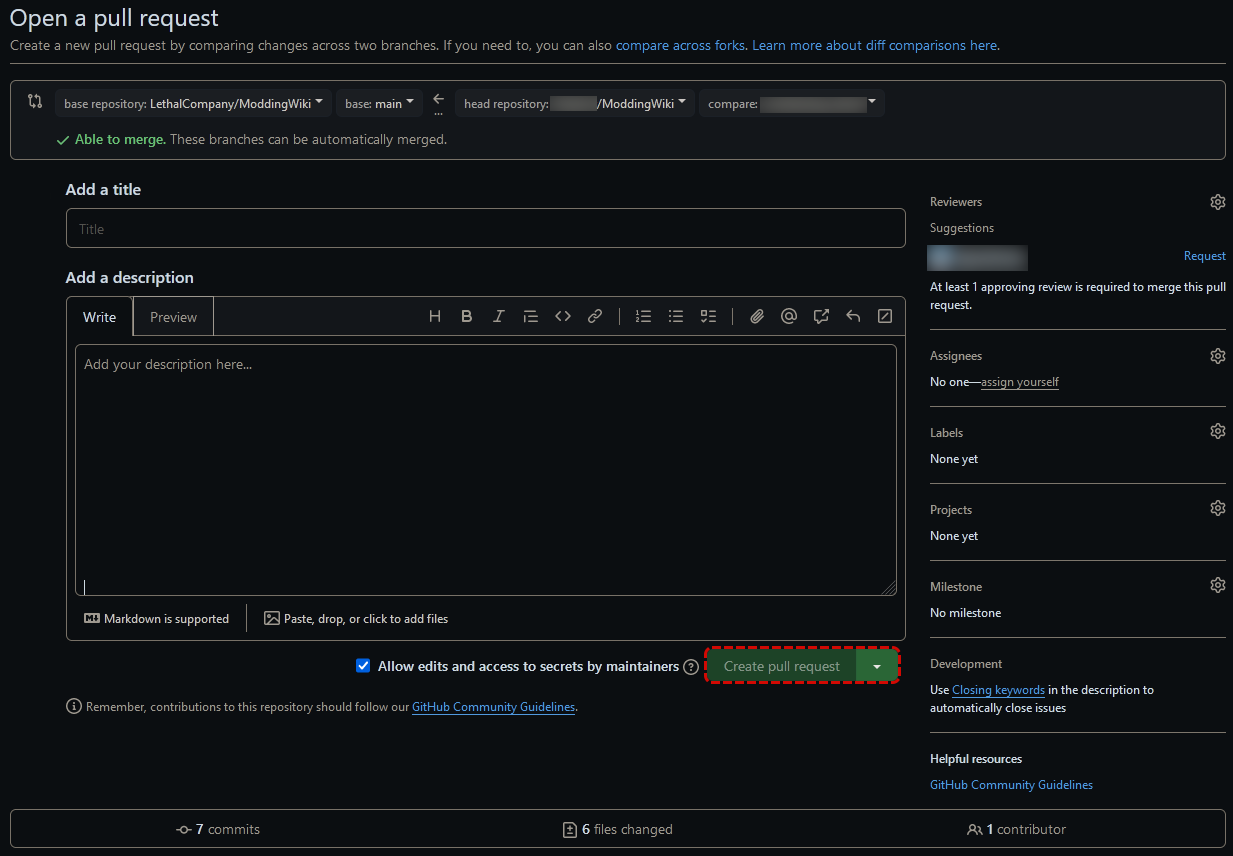
Here, name your PR and describe of what you added and/or changed. GitHub uses markdown formatting for the description, so you can use that to better show your changes.
Once you've written up the description, just press Create pull request in the bottom right, and your PR will be submitted!
TIP
Please give a summary of what your PR adds and a list of changes made.