A guide to Lethal Company audio modding (using CustomSounds)
WARNING
This is not a tutorial on how to replace audio with BepInEx using Harmony Patching or with LCSoundTool. This is a guide for using CustomSounds to replace audio. If you want to make a standalone audio mod without CustomSounds, this guide is not for you.
Installing the mods
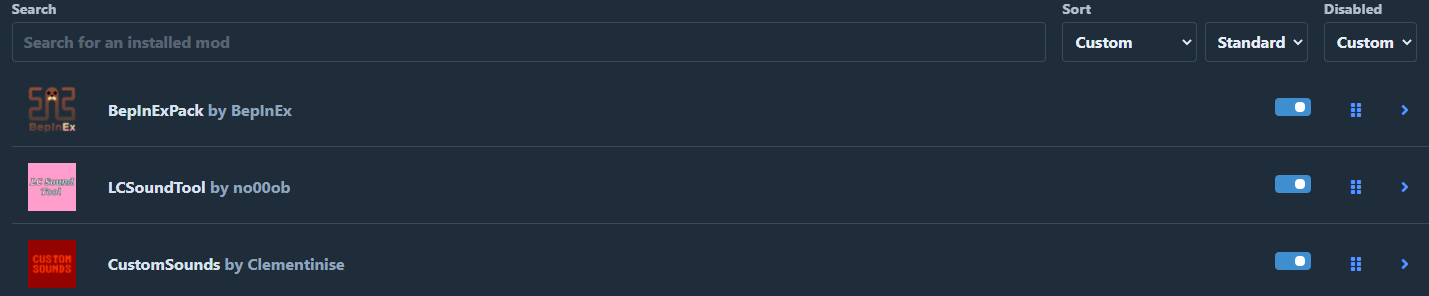
You need to install the following mods to be able to add custom sounds:
If you're using r2modman or the Thunderstore manager, your basic setup should look like this:
Finding the audio files
If you want to replace an audio file, you need to know which sound you're actually replacing. For the sake of the guide, I'm going to try and find the audio files for the "Icecream Truck" music whenever the delivery ship lands, but you can apply this process to any sound you'd like to replace.
Extracting the audio files
To find the sound file you want to replace, I personally recommend extracting all the audio files from the game so you have easy access to them, which makes finding them a lot easier.
You can do this by using a program called AssetRipper. Make sure to use the latest version (NOT the pre-release one).
First, open up AssetRipper. Before update 2.3, you had to set the audio export format to .wav, but you don't need to do that anymore, as CustomSounds now supports .ogg, .mp3 and .wav files.
Afterwards, on the top toolbar go to File > Open Folder, and select "Lethal Company_Data", which you can find in the directory where Lethal Company is installed (if you don't know where your game is installed, just go to Steam, right click on Lethal Company, and then go to Manage > Browse Local Files).
If everything worked correctly, you should be seeing this window:
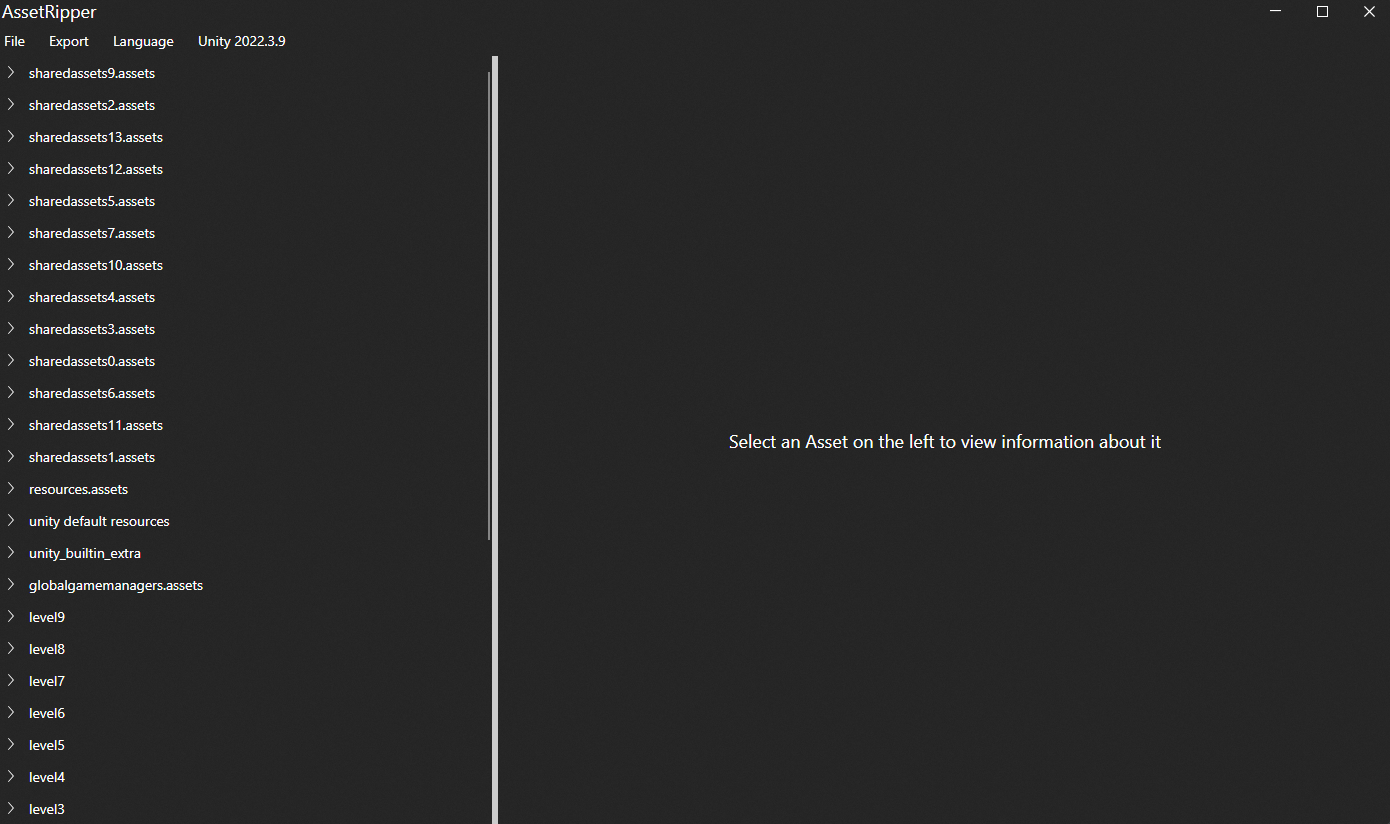
Now, to extract ALL the audio files from the game, you need to find an AudioClip file in one of the sharedassets folders.
For example, if you click on the arrow next to sharedassets0 and then the one next to AudioClip you should be able to see the files BootUp, ButtonPress1 and HoverButton1. Now, click on any one of these files so that it's selected, and at the top click on Export > Export All Files of Selected Type.
Afterwards, select where you would like to save the audio files and click Select Folder. At the time of writing this guide, there should be exactly 769 audio files that you can export.
Afterwards, go to the directory you exported the audio files to, and go to Lethal Company\ExportedProject\Assets\AudioClip, and there, you should be able to see all the audio files that are currently in the game! Feel free to copy these files somewhere else or to delete the .meta files.
You can usually find the files just by looking at the audio names, they have pretty logical names. For example, the ship "ice cream truck music" is literally called "IcecreamTruckV2" and "IcecreamTruckFar".
However, if you REALLY can't find the sound file you're looking for, then Step 2.2 is for you. Otherwise, you can go directly to Step 3.
Using LCSoundTool
TIP
If you already have found the audio file you're looking for, you can skip directly to the next section.
If you can't find the sound you're replacing by just looking at the extracted audio files, then you can use method this to find out the exact name of the sound file.
LCSoundTool has a logging function which can be activated / deactivated by pressing F5 when in the game, and it prints the current sound being played to the BepinEx console. For this to actually show up in the console, you need to edit the BepInEx.cfg file, which you can access by going to BepInEx/config/BepInEx.cfg, or if you're using r2modman / Thunderstore, by going into Config Editor and BePinEx.cfg as shown in this image:

In particular, you need to change 4 settings to the following parameters:
[Chainloader] HideManagerGameObject = true
[Logging.Console] Enabled = true
[Logging.Console] LogLevels = Fatal, Error, Warning, Message, Info, Debug
[Logging.Disk] WriteUnityLog = false
Make sure to change the LogLevels in Logging.Console, I've seen a lot of people skipping this step because they thought everything was included when they missed adding Debug. Once you're done editing the cfg file, press Save at the top of r2modman / Thunderstore or just save normally if you're accessing the file directly.
Now when you boot up the game you should see the following message whenever you press F5 to enable / disable the logging:
[Debug :LCSoundTool] Toggling AudioSource debug logs True!If you want to find out the sounds of enemies, I recommend downloading the mod "GameMaster" as it allows you to spawn enemies and give yourself god mode so you don't die while you look at the console, and a bunch of other options that make this process easier.
Anyways, for the "Ice cream truck" music, I ordered an item through the terminal and spawned into a map, and once it arrives you can clearly see which sounds are responsible for playing the music:
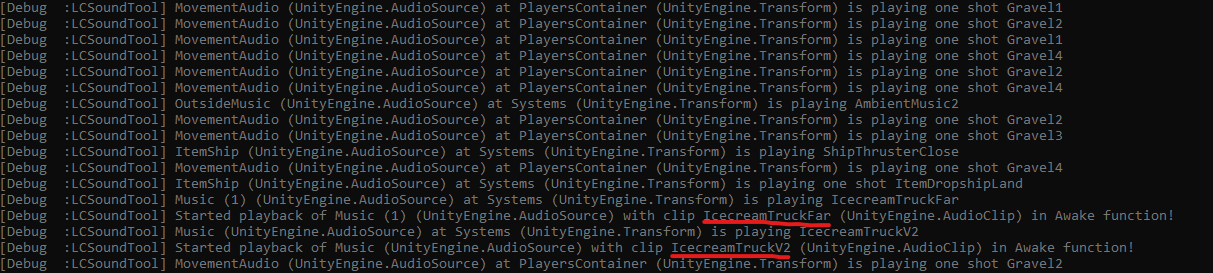
So now we know that we need to replace the sound files IcecreamTruckFar and IcecreamTruckV2 to make it play custom music! You can repeat this process for (almost) all sounds, so if you want to know what sounds the Jester enemy makes, then you spawn in a Jester enemy and wait until it plays the sound effect you want to replace.
Replacing the audio files
So, now we know that the files we're looking for are IcecreamTruckFar and IcecreamTruckV2. How do you replace them?
First, make sure to change the config in BepInEx.cfg. In particular, set the following parameter to true:
[Chainloader] HideManagerGameObject = trueCustomSounds will NOT work if you don't set this paremeter.
Second, you need to rename whatever audio file you're going to use to replace the original one, and (if it isn't already) convert the audio format. So if you have a file called IcecreamMusic.mp3, then you need to rename it to IcecreamTruckV2 and convert it to .wav,.mp3 or .ogg.
Once you're done with that, you need to place the audio files in the folder where CustomSounds is installed.
For the manual installers:
Go to BepInEx\plugins\CustomSounds and place the files either directly in there or make another folder inside of CustomSounds and put them there.
For r2modman \ Thunderstore users:
Go to settings>Browse profile folder, and then go into BepInEx\plugins\Clementinise-CustomSounds\CustomSounds and either place the audio files directly there or make another folder inside of CustomSounds and put them there.
NOTE
r2modman WILL delete your custom sound files each time you update CustomSounds, so I would recommend to keep your replacement sounds in another folder so you can quickly swap them back in the case an update comes out.
Additional features
CustomSounds has added a few features with Update 2.1.0. This is a rewrite of the CHANGELOG taken from Thunderstore:
You can now use multiple files to replace one sound effect, and then set a random % chance for each of these replacement sounds to play. So, for example, you can replace the JackOLanternHit sound with two sound files, change their names into JackOLanternHit-25.wav and JackOLanternHit-75.wav, and they will respectively have a 25% and a 75% chance of playing that particular sound.
Additionally, you can now add short descriptions to sounds that show up in the terminal when you type in "customsounds list". For instance, if you want to add a description to the JackOLanternHit.wav sound file, you would just name it JackOLanternHit-Funny-Laugh.wav, and it will display as "JackOLanternHit [Funny Laugh]" in the terminal.
Testing the replacement
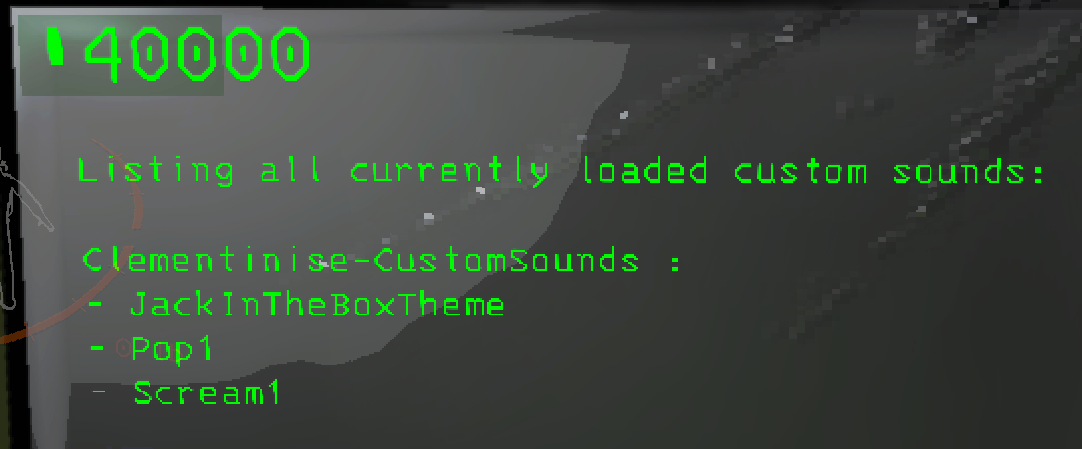
If you did everything correctly, you should see the files loading in the BepInEx console. Alternatively, you can just go into your ship and type "customsounds help" in your terminal to see all the available commands. If your replacement sounds have loaded correctly, then you should be able to see them if you type in "customsounds list" like this:
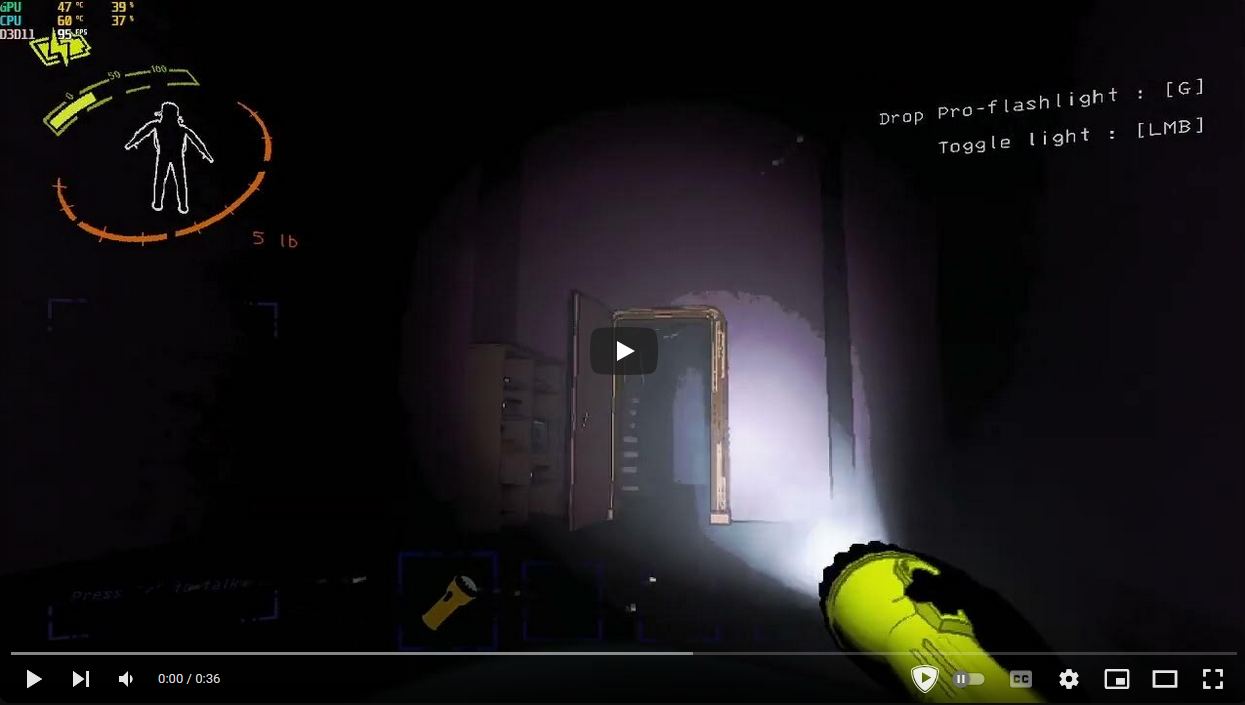
Here's a little fun demo of how this particular setup looks like:
Sharing custom sounds with friends
File sharing
This one is by far the most obvious and simple method, you just put the audio files into a .zip file, upload it somewhere, tell your friends to download it and put it into the CustomSounds folder, and that's it.
Uploading to Thunderstore
The only thing you need to keep in mind when publishing your mod is to keep this particular folder structure:
- manifest.json
- README.md
- CHANGELOG.md (Optional)
- icon.png
- BepInEx
    - plugins
        - CustomSounds
            - <YourSoundPackName>
                - [Insert All Audio Files Here]
For the rest, check out the section on how to publish your mod here on this wiki.
FAQ
I converted the files to .wav, .mp3 or .ogg through the windows file explorer, and it doesn't work. Why?
You can't just rename a .mp3 file to a .wav file and expect it to work. Sound files with different extensions store data differently. Windows does NOT convert the actual data inside of the sound files, it just changes the NAME of the extension, meaning that it's basically just a .mp3 file that appears as a .wav file, but isn't. Use a proper audio file converter instead -- there's a lot of options online. You can use Audacity, ffmpeg, or just any online file converter.
I can't upload my mod to Thunderstore, why?
Check for the obvious things, did you name the files correctly? Is it called manifest.json instead of manifest.json.json? Is your folder path for the CustomSounds correct? Is your manifest.json correct?
My sound mod isn't working even though the sounds appear on the list!
First, make sure that you changed HideManagerGameObject in BepInEx.cfg to True. You can do this in Thunderstore / r2modman by going into Config Editor > BepInEx.cfg, or just manually changing it in the BepInEx/configs directory.
Second, Make sure that you have replaced the correct audio file. A lot of people have reported to me that their sound mod "doesn't work", while in reality it works perfectly fine, but it's just not the sound that they expected to replace. A common example is the light switch in the ship, where the actual sound files are called FlashlightClickMini and FlashlightClickMini2, and NOT LightOff and LightOn, which are actually responsible for the breaker panel in the dungeon.
Other than that, check for anomalies within the sound files themselves. If everything else fails, try converting the audio file again through Audacity, as sometimes .wav files just fail to play due to outdated .wav formats.
None of these questions solve my problem! How can I contact you?
If you have any other questions then feel free to ping me over on the Lethal Company Discord, or just DM me on Discord (nickname: futuresavior). I want to clarify that I am not the developer of CustomSounds, that's Clementinise, who you can also contact on the same discord. Please do NOT send me friend requests, just DM me directly, and don't forget to have fun :)
Credits
Thank you to Clementinise for creating CustomSounds and proof-reading my guide, and to no00ob for creating LCSoundTool, both of your mods are amazing and appreciated <3