ExampleEnemy Unity Project
IMPORTANT
The Unity project this page references is in the LC-ExampleEnemy repository! So if you didn't already download your copy of the project, now is the time to do it!
You can open the Unity project from Unity Hub by choosing to open a project from disk, and selecting the UnityProject folder. When Unity has loaded the project, look into the ExampleEnemy folder for the assets that make up our asset bundle.
Setting Up Our Unity Project
TIP
You must have git installed for the AssetBundle Browser extension.
Also, the SETUP-PROJECT.py script will copy all of the dlls files for you! So if you run it, you can ignore this section almost entirely.
The Unity project we have is based off of Evaisa's Lethal Company Unity Template. However, just like with our dlls in the root directory of our project, we need to add some dll files into our UnityProject/Assets/Plugins folder. These are listed in the README of Evaisa's repository, but here's the list so you don't miss it:
List of game DLLs
AmazingAssets.TerrainToMesh.dllClientNetworkTransform.dllDissonanceVoip.dllFacepunch Transport for Netcode for GameObjects.dllFacepunch.Steamworks.Win64.dllNewtonsoft.Json.dllAssembly-CSharp-firstpass.dllD
We also want to add various DLL files our own DLL files might depend on, so let's add the following DLL files from Lethal Company/BepInEx/core:
List of BepInEx Core DLLs
0Harmony20.dll0Harmony.dllBepInEx.dllBepInEx.Preloader.dllHarmonyXInterop.dllMono.Cecil.dllMono.Cecil.Mdb.dllMono.Cecil.Pdb.dllMono.Cecil.Rocks.dllMonoMod.RuntimeDetour.dllMonoMod.Utils.dll
It seems that BepInEx.Harmony.dll causes Unity to crash, so we don't include it.
We also depend on LethalLib by Evaisa (which is already included in the project), and it depends on MMHOOK, so you need to run the game once with MMHOOK so these dll files are generated:
List of MMHOOK DLLs
- MMHOOK_AmazingAssets.TerrainToMesh.dll
- MMHOOK_Assembly-CSharp.dll
- MMHOOK_ClientNetworkTransform.dll
- MMHOOK_DissonanceVoip.dll
- MMHOOK_Facepunch.Steamworks.Win64.dll
- MMHOOK_Facepunch Transport for Netcode for GameObjects.dll
The dll file of our mod also needs to be there so we can reference ExampleEnemyAI.cs from a component of the ExampleEnemy prefab in Unity. We need to do this via a dll file, we cannot just copy and paste the ExampleEnemyAI.cs file in the Unity project because asset bundles cannot contain scripts, and it just doesn't get the reference otherwise. You know it doesn't get the reference in the form of a yellow warning text if you launch the game with the mod and you have unity logging enabled in the BepInEx.cfg file.
Our Example Enemy Assets in Unity
TIP
The way we figure out how enemies are configured in Unity is done by looking at the Asset Ripper's Unity project output of the game files. You can use AssetRipper Guid Patcher to get a Unity project based on the game files!
We have made an ExampleEnemy folder in our Unity project. Everything that goes into our asset bundle is in there. The first thing we did was import our fbx model into Unity. This is as simple as dragging our fbx file into our assets, or right clicking and choosing Import New Asset... and choosing our fbx file. The exported fbx model contains all our materials, textures and animations when first imported, but it is good to separate some of that stuff into their own folders. We have extracted our materials into the Materials folder.
We have also copied the individual animations into the Animations folder, because I don't know how to separate them properly, but we can just ignore the animations embedded in the fbx file and use the copies inside the Animations folder anyways.
Anyways, how do we make the game see our assets as an enemy? Well, we create a new ScriptableObject of type EnemyType. This can be done by right clicking in your asset files, and doing Create -> ScriptableObjects -> EnemyType. This is what the game uses, so we need it too. Do note that these ScriptableObjects come from the Lethal Company Unity Template this is based off of. Do also note that our UnityProject in this repository is already configured properly.
The EnemyType ScriptableObject has some configuration options, and the most important thing is the "Enemy Prefab" part of it. This is where we tell it what the model and whatever stuff our EnemyType has. Also note the "Enemy Name" thingy, this will be the name of the example enemy in the coding side of things.
The EnemyType Scriptable Object
Spawning Logic
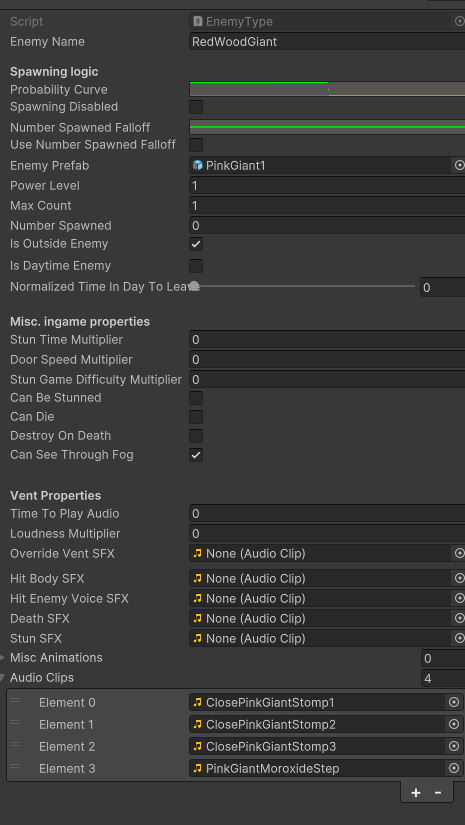 Enemy Type options:
- Probability Curve:
- Y-axis: Probability from 1 to 0, presumably 100% to 0% of the enemy's rarity or spawn weight given when registering the enemy.
- X-axis: Probability from 1 to 0, presumably 100% to 0% of the daytime cycle, e.g. from 8am to 11:59pm ingame.
So if you wanted your enemy to be spawning from 3pm to 6pm with 50% spawn weight on 3pm and linearly increasing to 75% onto 6pm, you'd do something like this: (43.15% to 62.5% so 0.4315 to 0.625 on the X-axis, which controls what time of day | 50% to 75% so 0.5 to 0.75 on the Y-axis, which controls the percent of spawn weight used).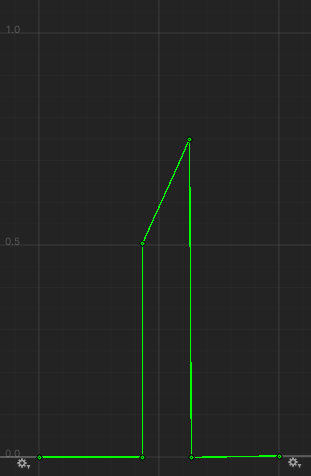
- Spawning Disabled: disables the natural spawning of your enemy.
- Number Spawned Falloff: hard to explain mathematically, but the use case is for when you'd want to reduce the probability of your monster spawning for every other of the same monster spawned, this is used for beehive code wherein the more beehives spawned, the lower the chance for the next beehive to spawn.
- Use Number Spawned Falloff: Whether to use just the Probability Curve or to use both the Probability Curve and the Number Spawned Falloff to dynamically affect the enemy's spawn weight mid-round.
- Enemy Prefab: The prefab.
- Power Level: How much this enemy contributes to the moon's internal max power level.
- Max Count: The max number of this enemy which can naturally spawn.
- Number Spawned: this should be a private value, ignore
- Is Outside Enemy: decides if the enemy is an "outside" creature.
- Is Daytime Enemy: decides if the enemy is a "daytime" creature.
- Normalized Time In Day To Leave: a value in the range [0, 1] showing the percenage of each day for which the enemy is calling a method (e.g. at
0.5, the daytime enemy runs the method at 4pm) // check pls
Misc. ingame properties
- Stun Time Multiplier: (
float) Multiplier that changes how long an enemy is stunned for based on the default Stun-grenade stun time of 7.5 seconds. - Door Speed Multiplier: (
float) Multiplier for how fast the enemy opens doors. - Stun Game Difficulty Multiplier: (
float) Multiplier that exponentially increases the difficulty for Zap Gun minigame against the enemy. - Can Be Stunned (
bool) - Can Die (
bool) - Destroy On Death: Whether or not the
GameObjectis destroyed upon enemy death. - Can See Through Fog: (
bool) Whether the enemy's line of sight gets clamped to a range between 0 and 30 near fog/on foggy area.
Vent Properties
- Time To Play Audio: (
float) Time it takes to play an audio before/while exiting the vent (specific toinsideenemies only) //unsure about this one - Loudness Multiplier: (
float) the volume multiplier for the Vent SFX. - Override Vent SFX: (
AudioClip) The audio clip which replaces the vent sound. Leave asNoneto use the default audio sound. (e.g. "kwoosh") - Hit Body SFX: (
AudioClip) For when the enemy's body is hit (e.g. "tushhh") - Hit Enemy Voice SFX: (
AudioClip) For when the enemy hits "something" (e.g. "aaah") - Death SFX: (
AudioClip) For when the enemy dies (e.g. "Aaaah!") - Stun SFX: (
AudioClip) For when the enemy is stunned (e.g. "Bzzzzt") - Misc Animations: Unused
- Audio Clips: (
AudioClip) The other audio clips you want to use (e.g. footstep sounds e.g. "badoosh.... badoosh..." (loops*1))
*1 Well, technically you would use an AnimationEvent, not loops.
The ExampleEnemy Prefab
TIP
If you don't know what prefabs are, see https://docs.unity3d.com/Manual/Prefabs.html
We have added these components to our prefab for everything to work properly:
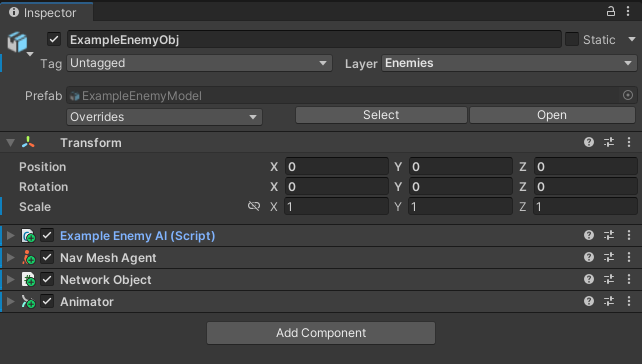
- Example Enemy AI (Script)
- This script can be found in
Plugin/src/ExampleEnemyAI.csat the root of this repository, and we have built our mod dll file and placed it insideAssets/Pluginsin our Unity project so we can add it as a component to our prefab. We must do it that way because Asset Bundles cannot contain scripts, and by doing it this way, our mod's AI script will get recognized as the same script.
- This script can be found in
- Network Object
- Needs to be added so our enemy's position can sync in multiplayer. After you reference your AI script, Unity will automatically prompt you to add this component.
- Nav Mesh Agent
- Allows our enemy to act as a nav mesh agent, which is Unity's system for making easy pathfinding in 3D with the help of a nav mesh that the agents walk on.
- Animator
- This allows us to control the animations of our model. This deserves its own section, and I barely know anything about Unity's animation system.
We also have these as children of the prefab itself:
- ScanNode
- Allows us to scan the enemy. Make sure the following is set:
- Tag:
DoNotSet - Layer:
ScanNode
- Tag:
- It also should have the following components:
- Scan Node Properties (Script)
- Notice: The
Creature Scan IDproperty is overridden by LethalLib, so it does not matter what we set it as. Same goes for theCreature File IDon the bestiaryTerminalNode.
- Notice: The
- A collider, such as:
Box Collider. While not necessary, it's a good idea to setisTrigger: truein order to avoid unwanted collisions with this object.
- Scan Node Properties (Script)
- Allows us to scan the enemy. Make sure the following is set:
- MapDot
- Allows us to see the enemy on map. Make sure the following is set:
- Tag:
DoNotSet - Layer:
MapRadar
- Tag:
- It is also worth nothing that this object gets rendered only on the map cameras, and the size and color of the object will be what you set them as in Unity.
- Allows us to see the enemy on map. Make sure the following is set:
- Collision
- Allows our enemy to collide with the player and other things. Make sure the following is set:
- Tag:
Enemy(allows certain interactions, such as opening doors) - Layer:
Enemies
- Tag:
- Must also have the following components:
- Enemy AI Collision Detect (Script)
- A collider, such as:
Box ColliderwithisTrigger: true Rigidbody, so it can interact with certain colliders. This is also needed for our enemy to be able to open doors.
- Allows our enemy to collide with the player and other things. Make sure the following is set:
- TurnCompass
- Does nothing by itself, but we have a reference to this in the
ExampleEnemyAI.csscript to make the enemy looking at player a bit easier.
- Does nothing by itself, but we have a reference to this in the
- AttackArea
- Does nothing by itself, but we take its position and scale and check if the player exists inside that area for the head swing attack.
- CreatureSFX
- We play the creature's sound effects through this.
- CreatureVoice
- We play the creature's voice through this.
- Eye
- The point from which the game checks for line of sight in some methods. Make sure to reference this as the
Eyein your AI script in Unity.
- The point from which the game checks for line of sight in some methods. Make sure to reference this as the
Animator
To access and use the Animator for a simple walking animation:
- Create an
Animator Controllerand assign the prefab theAnimatorcomponent. - Double click the
Animator Conrollerto go into its edit menu and create one layer. - Start off by doing something simple, like having a spawning into walking animation by right-clicking the green Entry button and making a transition to the first animation you want to start it off with (the spawning animation, or idle animation in the below example), then make another empty state by right-clicking nothingness and make a
sub-stateand naming it walkCycle or something similar, make sure to make two transition arrows pointing between eachother if you'd like to go from one animation to another later, it should look something like this now: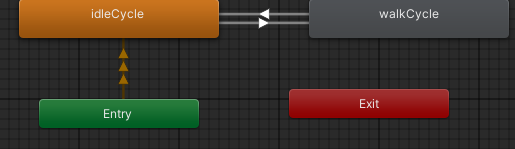
- Click the
sub-state's and make sure that attributes such asMotionare filled in with a .anim file, and that speed is set to the default 1. - Now make some animation conditions, to do this, go to the parameters tab, next to the layers tab under Animator, press the "+" sign and add a
trigger, this is what you'll call on your code to transition between animations, for now, make a couple like "startWalk" and "stopWalk". - Then click the arrows in-between the
sub-state(e.g. idleCycle into walkCycle, ignoring the arrow from entry), there should be a menu on the side with a lot of options. First, if you would like the walkCycle to loop, then press theHas Exit Timeattribute, as it'll allow for looping. Second, Work on the transitions between the actual animations such as the idleCycle animation and the walkCycle animation, this will take a bit of fiddling to get the right transition timings. Third, add a condition such as "startWalk" as you're transition from a spawning animation or idle animation, into a walking animation.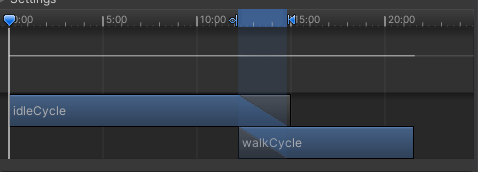 That should be good enough to get you started, this tool is very self-intuitive and takes a bit of practise getting used to, to wrap up this section, I'll be explaining how the
 Any Statesub-stateworks, andAnimationEvent's.
Any State
Any Statesimply allows you to set a transition from every state into anothersub-statewithout making a lot of disorganising connections, each animation transition is edit-able but requires all transition having eitherHas Exit Timeturned on, or a global condition such as "stopWalk" inserted, this makes it ideal for animations such as "startDeath" where the enemy dies and needs to interrupt any animation to start its death animation.
AnimationEvents
AnimationEventsallow you to call functions during animations, using theAnimatorsection as reference, during the walking animation, to simulate the sound of footsteps, assuming you have access to anAudioClipof the footstep sound, create a function that plays the footstep sound.- Make sure your enemy prefab is selected, then go down to the menu that says "Project Console", right-click "Project", hover over "Add Tab" and press "Animation", This adds an interactable Animation tab to the bottom, now select it.
- The tab contains the following:
- An animation player with record, preview, pause, start, etc.
- A few buttons to add keyframes for animation and add events, we'll be focusing on "Add Events" option.
- A drop-down menu that contains all the animations connected to the
Animatorwhich is connected to the prefab, use that to select the walking animation.
- To add an
AnimationEvent, you'd need to first find the frame in which the foot just barely connects to the ground, and press the "Add Event." button, this creates anAnimation Eventin the inspector. - Press the "Function:" drop-down menu, select your
EnemyAI, and find the function that you created to play footstep sounds.
IMPORTANT
For whatever reason, a function may not be displayed within your EnemyAI in AnimationEvent if it contains a parameter such as AudioClip, I'm not sure what parameters are not accepted, but making a void function seems to work best.
ExampleEnemy Terminal Entry
We need a TerminalNode ScriptableObject for our entry in the bestiary. This contains the bestiary's Display Text field that may contain sigurd's notes and enemy lore, and Creature Name field that shows when the user inputs bestiary into the terminal.
We also have a TerminalKeyword ScriptableObject, which has the word that the user needs to write in the terminal to find the page.
WARNING
If an existing item in the game starts with the same word as your enemy's name, that can cause the game to think we are trying to buy that item and not being able to open the bestiary entry. As a workaround, you can try changing the name that is shown and used for opening the terminal entry. Additionally, the Word attribute can not have any capital letters in it, they seem to not handle capitals well.
The enemy spinning animation on the bestiary entry background is a video file, and you can make one yourself in Blender by for example using the decimate (if you have a lot of geometry) and wireframe modifiers.
IMPORTANT
Unity Editor on Linux has bad support for video files, so if you are using Linux, you might want to encode your video to VP8 using FFmpeg. Unfortunately, Blender does not have an option to encode to VP8.
Asset Bundling
We need to package our assets into an Asset Bundle in order to be able to load them from our plugin. See Asset Bundling to find out how this is done.
TIP
We have a SETUP-PROJECT.py script in our project which generates a csproj.user file. This file will copy your mod DLL and Asset Bundle to the path you specified when running the setup script, each time you build your plugin.
Just make sure to keep the asset bundle name the default, or you'll have to edit your csproj.user file to look for the new name, in which case you may also want to edit our setup script to look for this new name in the file it generates.