Custom scrap/shopitem with LethalLib
Preamble
Make sure you've done everything in the LethalLib main page first. This page will run through everything needed to make a new scrap item from scratch in the template project.
At bare minimum, you will need the following added to your template project to create a custom scrap item:
- A model of your scrap (and materials using the HDRP Lit shader)
- An icon for the scrap when in the hotbar
Item Data
The first thing you should create is the Item Data for your custom scrap, which can be created right-clicking in your asset window and going to create -> ScriptableObject -> Item 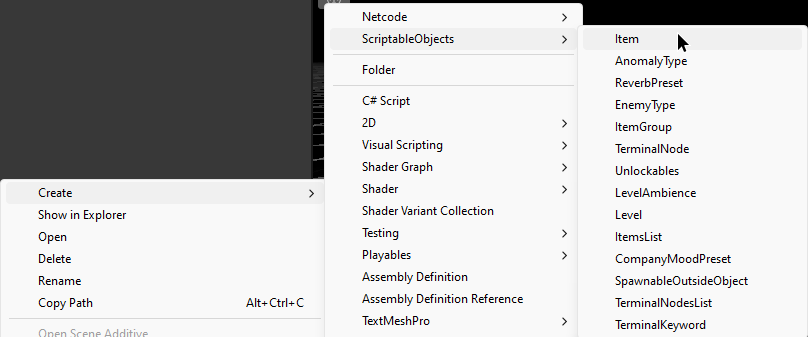
This item data lets you configure basically everything about your item. There are a lot of options, but the important ones for scrap are:
Item Id: (
int) Keep it 0, handled by LL.Item Name: (
string) the name of the item.Spawn Position Types: Spawn position types this item can spawn at. If the list is empty, the scrap can spawn anywhere (recommended to just leave this empty except for stuff like special scrap placement for custom moons).
Two Handed: (
bool) Whether the item gives the "Hands Full" message and prevents changing items.Two Handed Animation: (
bool) Whether the item uses the two-handed animation for carrying or not.Can Be Grabbed Before Game Start: (
bool) Usually recommended true.Weight: (
float) Determines the weight of the scrap. The weight in-game is equal to (this value - 1) * 105 (e.g. 1.18 is 18.9 lbs (ingame doesn't show decimals)).Item Spawns On Ground: (
bool) Should be true for scrap.Is Conductive Metal: (
bool) Whether this item attracts lightning.
Scrap-collection
Is Scrap: (
bool) Whether the item is a scrap (an item can be a scrap, shop item, or both).Credits Worth: (
int) Price of buying item in-game if registered as a shopitem (should be automatically set).Highest Sale Percentage: (
int) The maximum percentage (0-90) the item can go on sale in the terminals store; All items have this set to 80.Max/Min Value: (
int) The value range for the item. Does not directly correlate to the range in-game; a multiplier of 0.4 is used to change the in-game scrap value (e.g. writing 50 to 100 will give scrap of value 20 to 40).Spawn Prefab: The prefab representing the item in the world. Creation of this is detailed later in this guide.
Item Icon: (
png -> Sprite (2D Texture)) The icon that appears in the hotbar while in the inventory.
Player animations
- Grab Anim: (
string) Animation used when holding an item (e.g. HoldLung, used to show that something is two-handed by having both hands out).
Player SFX
- Grab SFX: (
AudioClip) Sound made when grabbing the item. - Drop SFX: (
AudioClip) Sound made when dropping the item. - Pocket SFX: (
AudioClip) Sound made switching into the item from another slot.
MISC
Is Defensive Weapon: (
bool) For scrap that also acts as weapons; requires more special scripting, so for most cases should be left off.Vertical Offset: (
float) The position offset from where the item is from the ground after spawning/dropping the item.Allow Dropping Ahead of Player: (
bool) Whether the item can be dropped in front of the player, as opposed to only dropping directly below their feet.Resting Rotation: (
float) How the scrap is rotated when laying on the ground.Rotation/Position Offset: (
float) The offset values for holding the item in your hand. Mostly needs manual fiddling with until it looks right for a given item.Mesh/Material Variants: Other possible meshes to use for the item than the default one picked.
INFO
It'll be good to note that when perfecting values for Resting Rotation, or Offset's or anything of that nature that requires multiple tests, it is best to launch the game with unity explorer, spawn the item/scrap, pick it up, go into the item's Item obj and try to find the values you'd like to change while holding the item, press apply whenever you change a value.
Everything else is optional, or shouldn't be modified.
Note that you will have to enable some of the netcode variables if you want them to sync properly in multiplayer.
Item Prefab
An item prefab needs to have a specific setup to work correctly with all the Lethal Company systems. The prefab should have only the root object and a child object called "ScanNode": 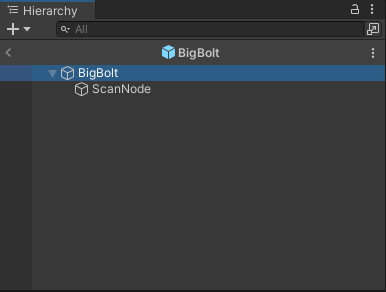
Root Object
The root object should have the following:
- Mesh Renderer + Mesh Filter for your model
- Box collider roughly encompassing your model
- Physics Prop script (See below for configuration) (To customise your item properly, create another class for the item and inherit from the GrabbableObject class)
- Audio Source with no clip assigned (See below for output setup). This is necessary even if you don't have any SFX.
- Network Object (See below for configuration)
The root object will also need to have the tag "PhysicsProp" and the layer set to "Props".
The Physics Prop script component should have:
- The checkboxes for "Grabbable", "Is In Factory", and optionally "Grabbable to Enemies" set to true
- The "Item Properties" assigned to the Item Data/Obj you created
The Network Object must only have the following options enabled, with everything else disabled:
- Synchronize Transform
- Scene Migration Synchronization
- Spawn With Observers
- Don't Destroy With Owner
The Audio source should use the "Diagetic" (Yes it's misspelled in the game files) audio mixing. If you're using a decompilation you can use the one already present, otherwise you can make an empty audio mixer with an identical name, and use the utility function FixMixerGroups() to swap the mixer using LethalLib (see Loading and Registering code note below)
ScanNode Object
On the ScanNode child gameobject, you should have the following:
- Box collider tightly encompassing your model
- Scan Node script
The Scan Node script component should have:
- Max/Min range set to the max/min distance to have your scrap detectable (13, 1 are typical values)
- Have require LOS enabled
- Header text as the name to show when scanned
- Sub Text set exactly to "Value: " (note the space after the colon)
- Scrap Value should be 0 (this is modified by the game at runtime)
- Creature Scan ID set to -1
- Node Type set to 2
The ScanNode object will also need to have the layer set to "ScanNode". 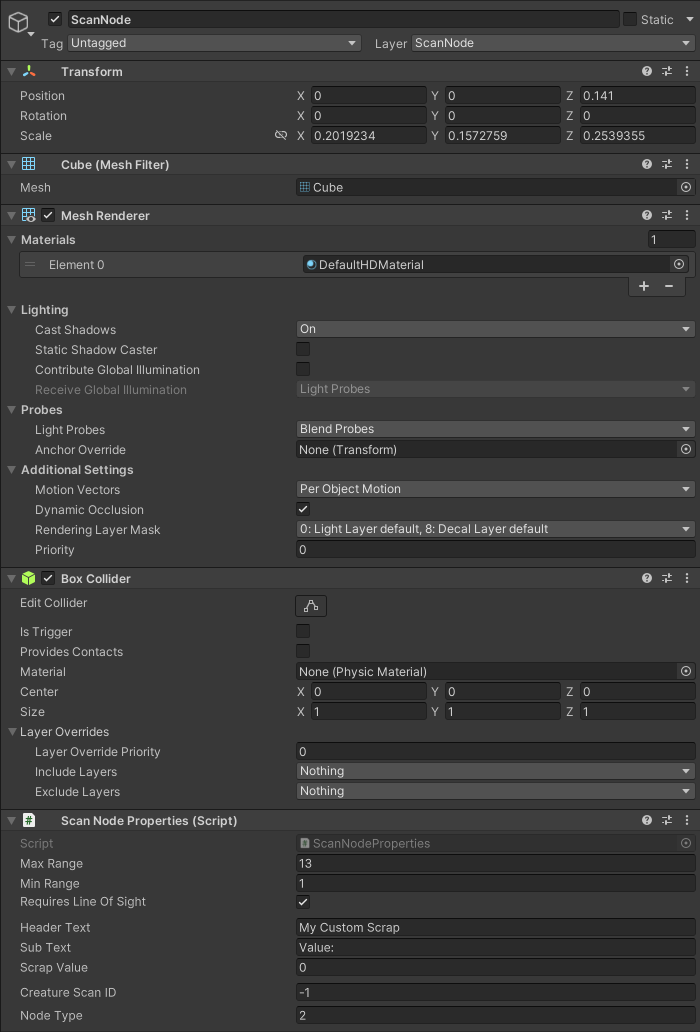
After you've done this, you should go back to your Item Data and assign the Spawn Prefab to be the item prefab.
TerminalNode
To make a buy-able Shop Item, you must make a custom TerminalNode for your item, I initially found this confusing as it needed a few TerminalNodes and a TerminalKeyword to get it working.
- Create 3
TerminalNodeScriptableObject's and 2TerminalKeywordScriptableObject's, Usually you'd only need 2TerminalNode's, but for the first setup, you'll need all 5. - Name the
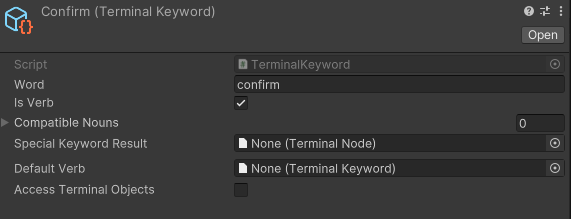
TerminalKeyword's "Confirm" and "Deny" (This is for when you're confirming or denying buying the item). - Name one of the
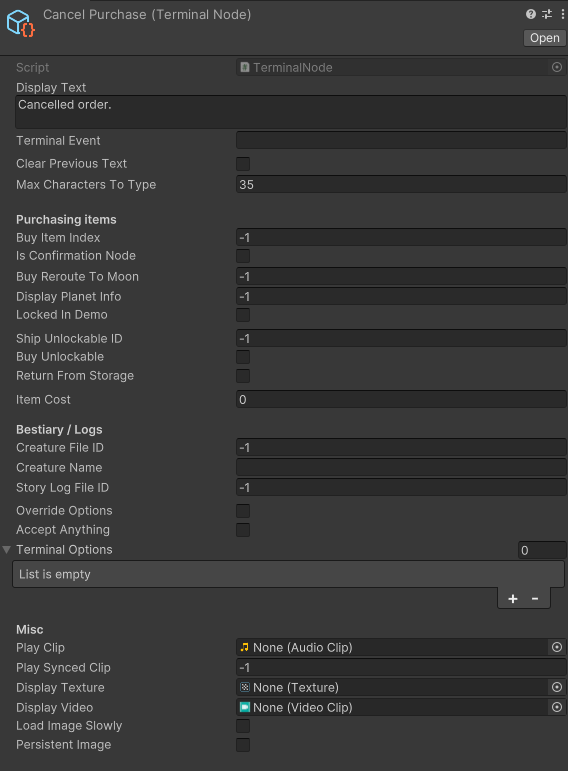
TerminalNode's "CancelPurchase" (This will be reusable for future shop items). - Keep the following
TerminalKeyword's andTerminalNodeto be as close to the screenshots as possible, this is the vanilla standard that's used for everytime (hence can be repeatedly used).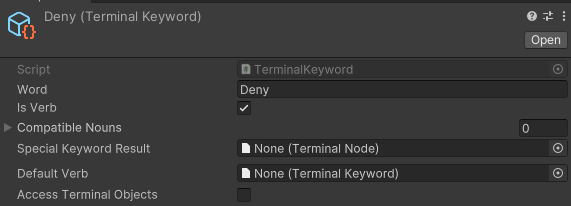
- Name one of the remaining two
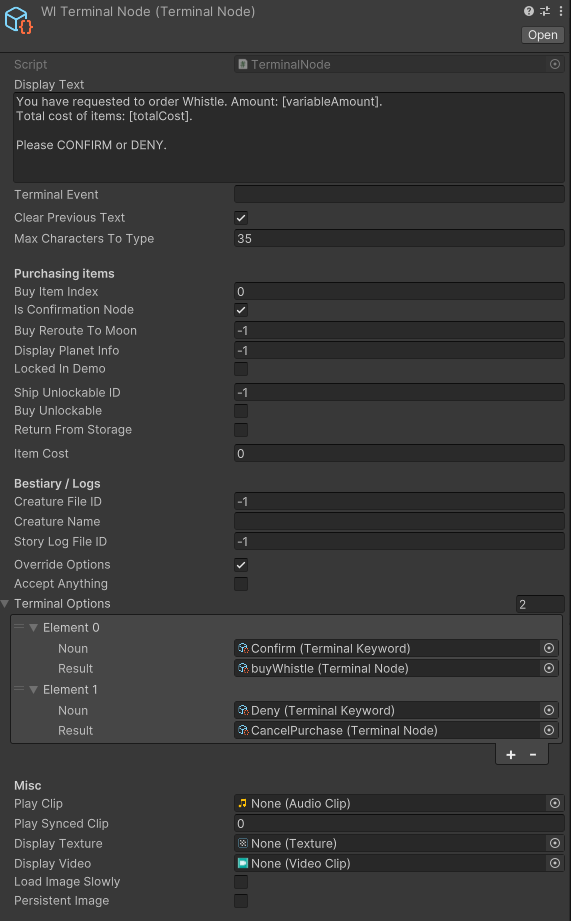
TerminalNode's "Buy{itemName}" (For whatever your item name is) and name the other an identifying name such as "iTerminalNode", this will be your mainTerminalNodethat you load and use. - Match this "Buy{itemName}"
TerminalNodeas such: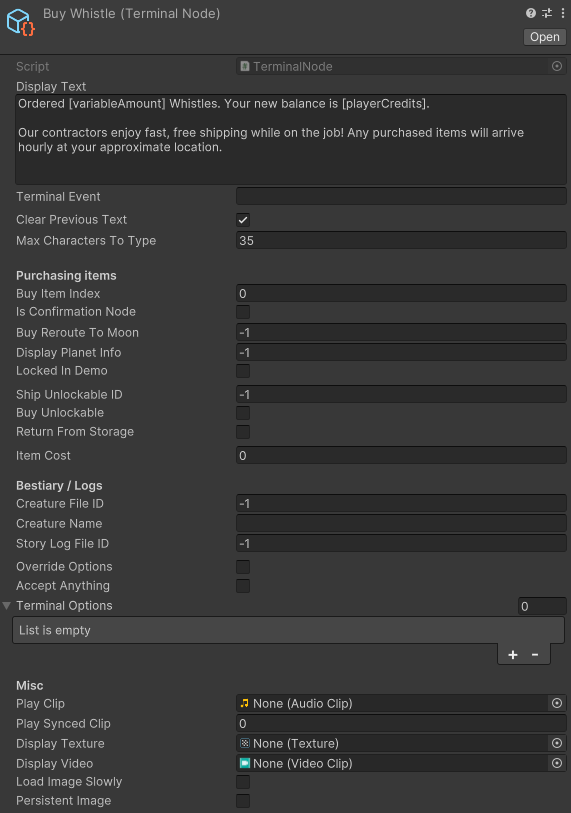
- Finally, match the last `TerminalNode like this:
::: display-text-to-copy
buy{itemName}:
Ordered [variableAmount] Whistles. Your new balance is [playerCredits].

Our contractors enjoy fast, free shipping while on the job! Any purchased items will arrive hourly at your approximate location.

CancelPurchase:
Cancelled order.

iTerminalNode:
You have requested to order Whistle. Amount: [variableAmount].
Total cost of items: [totalCost].

Please CONFIRM or DENY.
:::
After this, you should put your item data, prefab, any anything they rely on such as models into an asset bundle (See Asset Bundling). You can add multiple items to the same asset bundle if you're adding a collection of items.
Loading And Registering
After creating your asset bundle and loading it in, you need to register your item prefab as a network object and add the scrap item data via LethalLib. This can be done with the following code:
int iRarity = 30;
Item MyCustomItem = MyAssetBundle.LoadAsset<Item>("directory/to/itemdataasset.asset");
LethalLib.Modules.NetworkPrefabs.RegisterNetworkPrefab(MyCustomItem.spawnPrefab);
LethalLib.Modules.Items.RegisterScrap(MyCustomItem, iRarity, LethalLib.Modules.Levels.LevelTypes.All);

// For registering a shop item, add:
int iPrice = 100;
TerminalNode iTerminalNode = MyAssetBundle.LoadAsset<TerminalNode>("directory/to/terminalnodedata.asset");
LethalLib.Modules.Items.RegisterShopItem(MyCustomItem, null, null, iterminalNode, iPrice);
INFO
You may register an item as both a Shop Item, and a scrap, but the ScanNode will won't be unique for either.
INFO
If you're using an empty audio mixer with the name "Diagetic" for the Audio Source, add the following line to fix the mixer:
Item MyCustomItem = MyAssetBundle.LoadAsset<Item>("directory/to/itemdataasset.asset");
LethalLib.Modules.Utilities.FixMixerGroups(MyCustomItem.spawnPrefab);
LethalLib.Modules.NetworkPrefabs.RegisterNetworkPrefab(MyCustomItem.spawnPrefab);
This may also fix issues with sounds playing twice, if that issue is occuring for you.
Rarity is a weight value that determines how likely the scrap is to spawn, with higher numbers meaning more likely to spawn. All scrap in the base game varies from 1 to 100 differing per-moon, and the value should be kept in that range.
Price is the cost of the item in the in-game store.
LevelTypes is a flag enum which provides some basic pre-defined options for moons, such as All, Vanilla, or any of the default moons individually. The enum supports bitwise operations, for example (LethalLib.Modules.Levels.LevelTypes.March | LethalLib.Modules.Levels.LevelTypes.Dine) will register the scrap for both March and Dine.
There is a third optional parameter taking in an array of strings. Each string is compared to the internal moon name of all registered moons and adds the scrap to that moon if they match, allowing you to add scrap to custom moons. The names are mod-dependent; check with the custom moon author or check their source code for the name of the selectable level data asset for that moon.
The vanilla moons can also be included through this third parameter, where all vanilla moons' selectable level data follow the naming scheme "MoonnameLevel", like "ExperimentationLevel". It is recommended to follow this naming scheme if you intend on creating a custom moon for consistency.
Scrap can be registered multiple times to have the rarity be different for specific moons, such as being more common on paid moons.
Conclusion
If you've done everything right, you should now find your custom scrap on the moons you've assigned it to. If you have any problems, you can reach out on the Lethal Company Discord.